Make A Read Only File
You create an important file and put some data in it, and you dont want to lose it either by deleting it mistakenly, and for safety reasons you need some additional warning message before deleting, make a Read-Only file. Follow the simple steps below
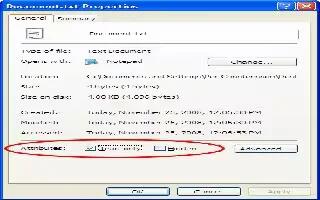
GUI Method
Right click on the file, you want to make it Read-only.
Click on the Properties tab from the context menu
Click the Read-only check box belong to Attributes from on the General tab from the popped up Properties window.
Click on Apply and then click on Okay.
Command Prompt Method
Open command prompt. You can open it by clicking on Start->Run, then type cmd and hit Enter. You can also press Win Key+R.
Write below codes and hit Enter to make your file Read-only.
- attrib +r “<file path=””>”</file>
- Example:
attrib +r "D:primeinspiration.txt
Note
Making a file Read-only helps you in many ways.
- It prompts when you try to change that file name.
- It prompts when you try to delete it.
To remove Read-only from a file
- In GUI method, just deselect that Read-only check box.
- In command prompt method, write that code with -r instead of +r.
Example: attrib -r “D:primeinspiration.txt”


 RSS - All Posts