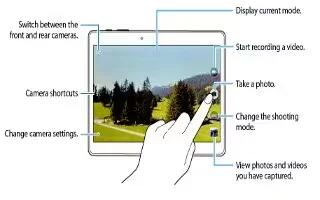
Learn how to use camera on your Samsung Galaxy Tab S. Use your devices built-in camera and camcorder to take photos.

- Tap Camera on the Apps screen.
- Tap the image on the preview screen where the camera should focus. When the subject is in focus, the focus frame turns green.
- Tap Camera icon to take a photo.
- Spread two fingers apart on the screen to zoom in, and pinch to zoom out.
- To capture an image from the video while recording, tap Camera icon.
Note
- The camera automatically shuts off when unused.
- Make sure that the lens is clean. Otherwise, the device may not work properly in some modes that require high resolutions.
- The front camera lens is suitable for taking wide-angle photos. Minor distortion may occur in wide-angle photos and does not indicate device performance problems.
Reorganising camera shortcuts

- You can reorganise camera shortcuts for fast and easy access on the preview screen. Tap Settings icon on the preview screen. Tap and hold an item and drag it to a slot at the left of the screen.
Camera etiquette
- Do not take photos of other people without their permission.
- Do not take photos where legally prohibited.
- Do not take photos in places where you may violate other peoples privacy.
Remote viewfinder
Use your device as a viewfinder for another device. You can control the other device remotely to take photos or videos from a distance. Your device displays the same image that is displayed on the connected device.

- Tap Camera on the Apps screen.
- Tap Settings > Remote viewfinder.
- Tap Wi-Fi Direct settings to connect to another device.
- Tap the image on the preview screen where the device should focus.
- Tap Camera icon to take the photo displayed on the connected devices viewfinder.
Note: Ensure that the device you want to connect to supports the remote viewfinder mode.
Shooting modes
Auto
Use this mode to allow the camera to evaluate the surroundings and determine the ideal mode for the photo.
- On the Apps screen, tap Camera > MODE > Auto.
Beauty face
Use this mode to take a photo with lightened faces for gentler images.
- On the Apps screen, tap Camera > MODE > Beauty face.
Shot & more
Use this mode to take a series of photos and modify them by applying various effects using the shooting modes. The device identifies the photos with Favorite icon in Gallery.
Note: The zoom function is not available while taking photos in this mode.
- Tap Camera on the Apps screen.
- Tap MODE > Shot & more.
- Tap Camera icon. The device takes a series of photos and displays the available shooting modes.
- Select a shooting mode and apply an effect to the photos.
- Best photo: Take a series of photos and save the best one. To view other photos in the series, scroll left or right. The device recommends the best photo and identifies it with.
- Best face: Take multiple group shots at the same time and combine them to create the best possible image. Tap the white frame on each face and choose the best individual pose for each subject from the poses that appear at the bottom of the screen. Then,merge the images into a single photo. The device recommends the best photo and identifies it with .
- Drama shot: Take a series of photos and combine them to create an image that shows motion trails. Extend the motion trail in the image by selecting more photos from the bottom of the screen. To edit the motion trails of selected photos, tap Edit icon and select a photo. Tap Restore to display subjects motion trails or tap Remove to erase the motion trails. Edit the photo as desired and tap Done.
- Eraser: Erase unwanted moving objects. Tap – icon to erase unwanted moving objects.Tap + icon to restore the original photo.
- Panning shot: Apply an effect to the subjects background that makes the subject appear to be moving fast. Tap Objects to select a subject. Tap Motion blur to change the angle of blurring to apply to the background. Tap Angle > Circle icon and draw a circle with your finger around the large circle to adjust the angle of blurring. To adjust the level of background blurring, tap Motion blur and drag the adjustment bar.
- When you are finished editing photos, tap Save.
Panorama
Use this mode to take a photo composed of many photos strung together. The device identifies the photo with in Gallery.
- On the Apps screen, tap Camera > MODE > Panorama.
Note
To get the best shot, follow these tips:
- Move the camera slowly in one direction.
- Keep the image within the frame on the cameras viewfinder.
- Avoid taking photos of indistinct backgrounds, such as an empty sky or a plain wall.
HDR (Rich tone)

Use this mode to take photos with rich colours and reproduce details even in bright and dark areas.
- On the Apps screen, tap Camera > MODE > HDR (Rich tone).
Managing shooting modes
Select the shooting modes to appear on the mode selection screen.
- On the Apps screen, tap Camera > MODE > Manage modes.
Downloading shooting modes
Download more shooting modes from Samsung Apps.
- On the Apps screen, tap Camera > MODE > Download.
Note
This guide will work on all Samsung Galaxy Tab S’s; including Samsung Galaxy Tab S 8.4 and Samsung Galaxy Tab S 10.5.
