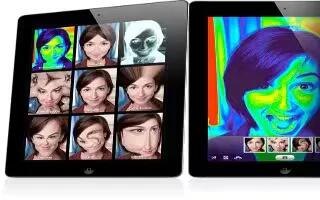
If you have an iPad 2 or later, its easy to take a photo using Photo Booth. Make your photo more interesting by applying an effect when you take it. Photo Booth works with both the front and back cameras. Continue reading the article on how to use this app.
How to select an effect on Photo Booth
Before you take a picture, you can select an effect to apply.
- Select an effect: Tap Effects icon, then tap the effect you want.
- Distort an image: If you select a distortion effect, drag your finger across the screen to change the distortion. You can also pinch, swipe, or rotate the image to change the distortion.
How to take a photo on Photo Booth
- To take a Photo Booth photo, just aim iPad and tap.
- Take a photo: Aim iPad and tap Camera icon.
- When you take a photo, iPad makes a shutter sound. You can use the volume buttons on the side of the iPad to control the volume of the shutter sound. You wont hear a sound if you set the Side Switch to silent.
Note: In some regions, sound effects are played even if the Side Switch is set to silent.
- Switch between the front and back cameras: Tap Switch Camera icon at the bottom of the screen.
- Review the photo youve just taken: Tap the thumbnail of your last shot. Swipe left or right to view more thumbnails.
- If you dont see the controls, tap the screen to display them.
- Delete a photo: Select a thumbnail, and then tap Delete.
- Manage photos: Tap one or more thumbnails. Tap curved right arrow icon, then tap Email, Copy, or Delete.
How to view and share photos on Photo Booth
The photos you take with Photo Booth are saved in your Camera Roll album in the Photos app on iPad.
- View photos in your Camera Roll album: In Photos, tap your Camera Roll album. To flip through the photos, tap the left or right button, or swipe left or right.
- You can use Mail to send a Photo Booth photo in an email message.
- Email a photo: Tap a thumbnail to select the photo, or tap again to select more than one photo. Tap curved right arrow Send icon, then tap the Email button at the bottom of the screen.
- Mail opens and creates a new message with the photo attached.
How to Upload photos to your computer on Photo Booth
Upload the photos you take with Photo Booth to photo applications on your computer, such as iPhoto on a Mac.
- Upload photos to your computer: Connect iPad to your computer using the Dock Connector to USB cable.
- Mac: Select the photos to upload, then click the Import or Download button in iPhoto or other supported photo application on your computer.
- PC: Follow the instructions that came with your photo application.
- If you delete the photos from iPad when you upload them to your computer, theyre removed from your Camera Roll album. You can use the Photos settings pane in iTunes to sync photos to the Photos app on iPad.
Note
This will work on iPad 2, iPad 3, and your new iPad.
