Learn how to use camera on your LG G Pro 2. To open the Camera application, tap Camera icon on the Home screen.
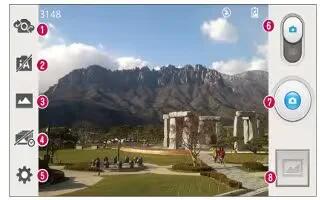
Getting to know the viewfinder

- Swap camera: Switch between the rearfacing camera lens and the front facing camera lens.
- Intelligent auto: Automatically identifies the scene’s characteristics and adjusts aperture, shutter speed, options to take a photo.
- Shot mode: Choose from Normal, HDR, Panorama, VR panorama, Burst shot, Beauty shot or Dual camera.
- Time catch shot: Touch this icon to capture the missing moment before pressing the shutter.
- Settings: Touch this icon to open the settings menu.
- Video mode: Touch and slide down this icon to switch to video mode.
- Take a photo
- Gallery: Touch to view the last photo you captured. This enables you to access your gallery and view saved photos while in camera mode.
Note: Please ensure the camera lens is clean before taking pictures.
Taking a quick photo
- Open the Camera application.
- Holding the phone horizontally, point the lens towards the subject you want to photograph.
- A focus box will appear in the center of the viewfinder screen. You can also tap anywhere on the screen to focus on that spot.
- When the focus box turns green, the camera has focused on your subject.
- Touch Camera icon to capture the photo.
Once you’ve taken a photo
- TouchGallery icon icon to view the last photo you took.
- SmartShare icon: Touch to share your photo using the SmartShare function.
- Camera icon: Touch to take another photo immediately.
- Share icon: Touch to send your photo to others or share it via social network services.
- Delete icon: Touch to delete the photo.
Note: If you have an SNS account and set it up on your phone, you can share your photo with your SNS community.
NoteAdditional charges may apply when MMS messages are downloaded while roaming.
- Touch the Menu key to open all advanced options.
- Set image as: Touch to use the photo as a Contact photo, Home screen wallpaper or Lock screen wallpaper.
- Move: Touch to move the photo to another place.
- Copy: Touch to copy the selected photo and save it to another album.
- Rename: Touch to edit the name of the selected photo.
- Rotate left/right: To rotate left or right.
- Crop: Crop your photo. Move your finger across the screen to select the area to be cropped.
- Edit: View and edit the photo.
- Slideshow: Automatically shows you the images in the current folder one after the other.
- Details: Find out more information about the file.
Viewing your saved photos
You can access your saved photos when in camera mode. Just tap the Gallery icon and your Gallery will be displayed.
- To view more photos, scroll left or right.
- To zoom in or out, double-tap the screen or place two fingers and spread them apart (move your fingers closer together to zoom out).
