Automate iCal On Mac
You can automate your iCal on your Mac using Automator. You can automate planning out iCal events at the beginning of each day. After your time investment in building the file, you will begin to see results day after day. Follow the simple steps below
Open up automator and click “custom” to indicate that you would like to create a new custom workflow:
Drag and drop the following 4 tasks into the right hand panel: “Ask for Text” , “Set Value of Variable” , “Get Value of Variable” and “New iCal events”
- In “Ask for Text” Type in the a question request the name of your iCal event: You might want to divide your calender into work periods or “chunks” so you ask “what is the most important ‘think’ (thing) you have to do in chunk 1?
Change “new variable” in the set variable action to “Chunk 1 name”: or whatever you’d like to call the name storage for that first task.
- On the right hand panel, a new bottom section called “variables” appears: Drag your newly created variable right into the “name” text field of the newly created iCal event.
Set the date, times and calender that you want the new event to be created in:
Drag the “Set Variable” action below your new event and create a new variable called “iCal event 1”:
Highlight (shift + click) all of the automator actions you just created: Copy and paste all 5 as many times as you’d like. Be sure to go into each one and create new variables and questions for each, since they will each be separate tasks. (you don’t want every question asking “what shall I call event 1?”)
- You probably won’t want to do more than 5 chunks of work in one day: We’re not robots after all.
Make sure that for each of the 5 (or whatever number) chunks right click (or option click) the “ask for text” action and select “ignore input”:
Use the “get value of variable” action and place after your last group of task inputs (those 5 actions we talked about): Add this in as many times as you have calender events. We need to gather all of your events up so that we can create an ‘event summary’
With all of the tasks gathered, place the ‘event summary’ action into your workflow: This creates a text summary of all of your events.
Use the “store text data” action if you would like to also save that summary into an email:
Use the “new text file” action to save that summary in a specified folder:
Use the “rename finder items” to change the name of that file so that you include the date in the name (for easy reference):
Use the “retrieve text data” action to get that store event summary again:
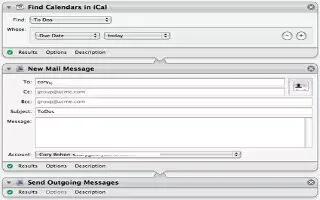
Use the “new mail message” action to create an email in mail: The text will automatically go in the field after your message. Make sure to set the subject and email address of the recipient.
Save your work:
Use daily: This may seem like a bit of work, but, you’ll be glad you made the investment.
Note
- Keep trying! It takes some practice using automator.
- Save and use daily!