How To Use Video Camera Settings – Sony Xperia Z Ultra
Learn how to use video camera settings on your Sony Xperia Z Ultra.
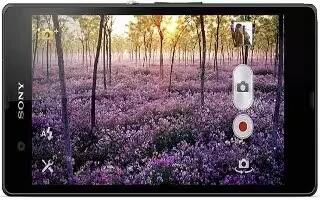
To adjust the video camera settings
- Activate the camera.
- Tap one of the settings icons on the screen.
- To display all settings, tap Settings icon.
- Select the setting that want to adjust, then make your changes.
To customize the video camera settings panel
- When the video camera is open, tap Settings icon to display all settings.
- Touch and hold the setting that you want to move, then drag it to the desired position.
Note: If you drag the setting outside of the settings panel, the change is cancelled.
Video camera settings overview
Scenes
The Scenes feature helps you to quickly set up the camera for common situations using pre-programmed scenes. The camera determines a number of settings for you to fit the selected scene, ensuring the best possible video.
- Off : The Scenes feature is off and you can shoot videos manually.
- Soft snap : Use for shooting videos against soft backgrounds.
- Landscape : Use for videos of landscapes. The camera focuses on distant objects.
- Night : When turned on, light sensitivity is increased. Use in poorly lit environments. Videos of fast-moving objects may get blurred. Hold your hand steady, or use a support. Turn off night mode when
- lighting conditions are good, to improve the video quality.
- Beach : Use in bright environments to avoid overexposed videos.
- Snow: Use in bright environments to avoid overexposed videos.
- Sports : Use for videos of fast-moving objects. Short exposure time minimises motion blurring.
- Party : Use for indoor videos in poorly lit environments. This scene picks up indoor background lighting or candlelight. Videos of fast-moving objects may get blurred. Hold your hand steady, or use asupport.
Video resolution
Adjust the video resolution for different formats.
- 19201080(16:9) : Full HD (Full High Definition) format with 16:9 aspect ratio. 19201080 pixels.
- 1280720(16:9) : HD (High Definition) format with 16:9 aspect ratio. 1280720 pixels.
- 640480(4:3) : VGA format with 4:3 aspect ratio. 640×480 pixels.
- 176144(11:9) : Record videos suitable for sending in multimedia messages. The recording time of this video format is limited to fit in a multimedia message.
Self-timer
With the self-timer you can record a video without holding the device. Use it to record group videos where everyone can be in the video. You can also use the self-timer to avoid shaking the camera when recording videos.
- On (10 s.) : Set a 10-second delay from when you tap the camera screen until the video begins to record.
- On (2 s.) : Set a 2-second delay from when you tap the camera screen until the video begins to record.
- Off : The video begins to record as soon as you tap the camera screen.
Quick launch
Use quick launch settings to launch the camera from the lock screen.
- Launch and capture : After you tap the screen, the still camera is launched from sleep mode and a photo is captured.
- Launch only (still camera) : After you tap the screen, the still camera is launched from sleep mode.
- Launch and record video: After you tap the screen, the video camera is launched from sleep mode and starts recording.
- Launch only (video camera) : After you tap the screen, the video camera is launched from sleep mode.
- Off
Focus mode
The focus setting controls which part of a video should be sharp. When continuous autofocus is on, the camera keeps adjusting focus so that the area within the white focus frame stays sharp.
- Single auto focus : The camera automatically focuses on the selected subject. Continuous autofocus is on.
- Face detection : The camera automatically detects up to five human faces, indicated by frames on the screen. The camera automatically focuses on the nearest face. You can also select which face to focus on by tapping it on the screen. When you tap the camera screen, a yellow frame shows which face is
- selected and in focus. Face detection cannot be used for all scene types. Continuous autofocus is on.
Object tracking
- When you select an object by touching it in the viewfinder, the camera tracks it for you.
Exposure value
- +/- icon: This setting allows you to determine the amount of light in the image you capture. A higher value indicates an increased amount of light.
Video HDR
- Use the video HDR (High-Dynamic Range) setting to record a video against strong back light or in conditions where the contrast is sharp. Video HDR compensates for the loss of detail and produces a picture that is representative of both dark and bright areas.
White balance
The white balance setting adjusts the color balance according to the lighting conditions.
- Auto : Adjust the color balance automatically to the lighting conditions.
- Incandescent:
- Adjusts the color balance for warm lighting conditions, such as under light bulbs.
- Fluorescent : Adjust the color balance for fluorescent lighting.
- Daylight : Adjust the color balance for sunny outdoor conditions.
- Cloudy : Adjust the color balance for a cloudy sky.
Metering
This function automatically determines a well-balanced exposure by measuring the amount of light striking the image that you want to capture.
- Centre : Adjust the exposure to the centre of the image.
- Average : Calculate the exposure based on the amount of light striking the whole image.
- Spot : Adjust the exposure in a very small part of the image that you want to capture.
- Image stabilizer When recording a video, it can be difficult to hold the device steady. The stabilizer helps you by compensating for small movements of the hand.
Geotagging
Tag photos with details of where you took them.
- On : When geotagging is turned on, the approximate geographical location is added to photos when you
- take them. To use geotagging, you must enable location features from the Settings menu. For geotags to be added to a photo, the location must be determined before you take the photo. Your location is determined when appears on the camera screen. When your device is searching for your position, appears.
- Off : When geotagging is turned off, you cannot view the location where you took a photo.
Microphone
- Select whether to pick up the surrounding sound when recording videos.
Touch capture
- Identify a particular focus area by touching the camera screen with your finger. The photo is taken as soon as you release your finger. This setting is only available when focus mode is set to touch focus.
Shutter sound
- Choose to turn on or turn off the shutter sound when you record a video.
Data storage
You can choose to save your data either to a removable SD card or to your device’s internal storage.
- Internal storage : Photos or videos are saved on the device memory.
- SD card : Photos or videos are saved on the SD card.


 RSS - All Posts