How To Use Camera – Samsung Galaxy Note 3
Learn how to configure camera on your Samsung Galaxy Note 3. This section explains features related to the use of the camera and camcorder on your phone. You can take photographs and shoot video by using the built-in camera functionality. Your 13 megapixel camera produces photos in JPEG format.
Note: Do not take photos of people without their permission. Do not take photos in places where cameras are not allowed. Do not take photos in places where you may interfere with another persons privacy.
Using the Camera

Taking Photos
- Taking pictures with your devices built-in camera is as simple as choosing a subject, pointing the camera, then pressing the camera key.
Note: When taking a photo in direct sunlight or in bright conditions, shadows may appear on the photo.
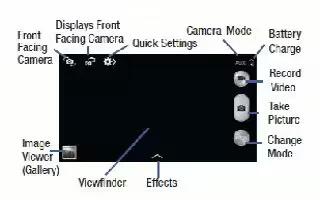
- From the main Home screen, tap Camera icon to activate the camera mode.
- Using the phones main display screen as a viewfinder, adjust the image by aiming the camera at the subject.
- Before you take a picture, use the Up and Down Volume keys to zoom in or out. You can magnify the picture up to x4 (400 percent).
or
- Pinch the screen to zoom out or pinch outwards to zoom in.
- If desired, before taking the photo, you can tap on-screen icons to access various camera options and settings.
- You can also tap the screen to move the focus to the area you touch.
- Press the Camera key until the shutter sounds. (The picture is automatically stored within yourdesignated storage location. If no microSD is installed, all pictures are stored on the Phone.)
- While viewing a picture, after you have taken it, pinch the screen outwards to zoom in or pinch the screen inwards to zoom out. You can magnify the picture up to x4.
- Press Back key to return to the viewfinder.
Taking Dual Camera Photos
- With the Dual Camera feature, you can take a picture with both the front and rear cameras at the same time.
To take a Dual Camera picture:
- From the camera viewfinder, tap the Dual Camera icon located at the top left side of the screen.
- The camera viewfinder displays an image from the front-facing camera within a postage stamp picture frame on top of the main image displayed from the rear-facing camera.
- Press the Camera key ( ) to take the picture.
To resize the front camera image:
- Touch and hold the postage stamp picture frame until the resize handles appear, then drag a corner to enlarge the image.
To reposition the front camera image
- Touch and hold the postage stamp picture frame to detach it and then move it to a desired location.
Camera Modes
There are many different camera modes that you can use to help optimize your photos depending on the conditions and your experience.
- From the camera viewfinder, tap the Mode button to change the mode to one of the following:
- Auto: Automatically adjusts your camera to optimize color and brightness. This is the default setting
- Beauty face: Use this to take photos with lightened faces for gentler images.
- Best photo: Use this to take multiple photos in a short time, and then choose the best photos among them. Press the Shutter button to take multiple photos. When Gallery opens, tap and hold thumbnails of photos to save, and then tap Done.
- Best face: Use this to take multiple group shots at the same time and combine them to create the best possible image. Press the Shutter button to take multiple photos. When Gallery opens, tap the yellow frame on each face, and choose the best individual face for the subject. After choosing a pose for each individual, tap Done to merge the images into a single photo, and tap Save. Sound & shot: Use this mode to enrich pictures by adding background sounds for a few seconds. The background sound is recorded for up to 9 seconds after taking the photo.
- Drama: Use this to take a series of photos of a moving object and then merge them together into one image.
- Animated photo: Use this to create a picture in which a few selected static objects move by animating objects detected by the device.
- Golf: Use this feature to take pictures of a gold swing and then play the pictures back (forwards or backwards).
- Rich tone (HDR): Use this to take photos with richer colors and contrasts.
- Eraser: Saves the best of 5 taken pictures and removes any passers by.
- Panorama: Use this to take wide panoramic photos. Press the Shutter button to take a photo, and then move the camera in any direction. When the blue frame aligns with the preview screen, the camera automatically takes another shot in the panoramic sequence. To stop shooting, press the Shutter button again.
- Surround shot: Use this to take a 360-degree pictures that are then used to create a spherical panorama.
- Sports: Use this to take fast action photos.
Quick Settings
Tap at the top of the display to quickly change Camera settings. Not all of the following options are available in both still camera and video camera modes. The available options vary by mode.


 RSS - All Posts