How To Use WPS On Samsung Galaxy Note 2
Learn how to use WPS Push button on Samsung Galaxy Note 2. The WPS (Wi-Fi Protected Setup) feature (sometimes associated with a physical or on-screen button on most WAPs) allows you to pair your device and WAP without the need for entering a passcode. This process is similar to Wi-Fi Direct pairing.
In this case, once the WPS feature is active on your WAP, your device can then detect it and then immediately pair to it.
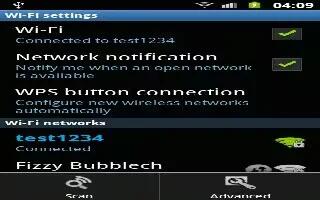
Note: WPS-capable routers appear in the Wi-Fi list of available devices with the term (WPS available) below their name.
To pair your device using WPS:
- Follow the WPS activation instructions specific to your Wireless Access Point.
- From the Home screen, press Menu key and then tap Settings > Wi-Fi.
- Press Menu key then tap Wi-Fi push button.
- Once the connection is complete, confirm the external router now appears in the Wi-Fi list as connected.
WPS PIN Entry on Samsung Galaxy Note 2
If a WPS Push Buttton does not work, there is an alternative WPS connection method where you would use a device generated PIN number to establish the connection. This number is then entered into your WAPs WPS client PIN field to complete the connection.
To pair your device using WPS PIN:
- From the Home screen, press Menu key and then tap Settings > Wi-Fi.
- Press Menu key then tap WPS PIN entry.
- Write down the generate PIN number and enter it into your Wi-Fi Routers client PIN field.
- Once the connection is complete, confirm the external router now appears in the Wi-Fi list as connected.
Wi-Fi Direct Setup and Settings on Samsung Galaxy Note 2
You can configure your device to connect directly with other Wi-Fi capable devices. This is an easy way to transfer data between devices. These devices must be enabled for Wi-Fi direct communication. This connection is direct and not via a HotSpot or WAP.
Note: Activating this feature will disconnect your current Wi-Fi network connection.
To activate your connection:
- From the Home screen, press Menu key and then tap Settings.
- In a single motion touch and slide the Wi-Fi slider to the right to turn it on. The slider color indicates the activation status.
- Tap Wi-Fi Direct.
- Tap Scan and select the single device name to begin the connection process to another Wi-Fi Direct compatible device.
or
- Tap Multi-connect > Scan and select all the device names to begin the connection process to these Wi-Fi Direct compatible devices.
Note: The target device must also have Wi-Fi Direct service active and running before it can be detected by your device.
- Tap Done. The direct connection is then established. Confirm Wi-Fi Direct is active and configured icon appears in the Status bar.
- When prompted to complete the connection, the recipient should tap OK. Your status field now reads Connected and your connected device is listed within the Wi-Fi Direct devices listing.
To give your Wi-Fi Direct connection a unique name:
It can be difficult to pair to external devices if all you have is a generic name (ex: Android 12345). It is recommended you provide your connection with a unique name.
- From the Home screen, press Menu key and then tap Settings > Wi-Fi > Wi-Fi Direct.
- Press Menu key and then tap Rename device.
- Edit the current name and tap OK to save the new identification.


 RSS - All Posts