How To Use Microsoft Exchange Email On Samsung Galaxy Note 2
Your Samsung Galaxy Note 2 also provides access to your companys Outlook Exchange server. If your company uses either Microsoft Exchange Server 2003 or 2007, you can use this email application to wirelessly synchronize your email, Contacts, and Calendar information directly with your companys Exchange server.
How to set up a Microsoft Exchange Email account on Samsung Galaxy Note 2
- From the Home screen, tap Apps icon > Email icon.
- If you already have other email account setup:
- Open an existing email account, press Menu key and then tap Settings > + icon Add new account.
- or
- Enter your Email address and Password information.
- Email address: your Outlook work email address.
- Password: typically your network access password (case-sensitive).
- Open an existing email account, press Menu key and then tap Settings > + icon Add new account.
- Tap Send email from this account by default, to make this your default email account for outbound emails.
- Tap Show password to display the password as you enter it in the associated field.
Note: If selected, the Manual setup button changes to read Microsoft Exchange ActiveSync. If activated, skip to step tapping Microsoft Exchange ActiveSync.
- Tap Next. Consult your Network or IT Administrator for further details and support.
- Tap Microsoft Exchange ActiveSync (from the add new email account screen).
Note: If prompted with an on-screen notification that the connection that the Setup could not finish, tap Edit details to continue with a manual update of necessary information.
- When prompted to provide additional detailed information within the Exchange server settings screen, enter an updated Domain, and confirm your user name and Password information.
Note: Remember to manually place the cursor in the correct spot and enter a Domain name before the [Domain][user name] entry. Most servers only provide a username.
- Update or re-enter your Exchange server information within the appropriate field. This field can often be populated with incorrect or out of date information provided by your server.
- Exchange Server: your exchange server remote email address. Typically starts with mail.XXX.com. Obtain this information from your company network administrator.
Note: Do not accept the default entry as this is a guess based on returned information.
- If your network requires SSL encryption, tap the Use secure connection (SSL) field to place a check mark in the box and activate this additional level. Most often, this option should be enabled.
- If your network requires that you accept SSL certificates, tap the Accept all SSL certificates field to place a check mark in the box and activate this additional level. Most often, this option is not required. Confirm this information with your IT Administrator.
Note: If your Exchange server requires this feature, leaving this field unchecked can prevent connection.
- Consult your IT Administrator if it is necessary to enable the Use client certification option.
- With the new server information entered, tap Next.
- Read the on-screen Activation disclaimer and, when prompted, tap OK. The device then verifies our incoming server settings.
- If prompted, read the Remote security administration information and tap OK to accept the service and continue.
- Adjust the various on-screen configuration fields and tap Next. It may take a few seconds for the next screen to load.
- Enabling the Automatically download attachments when connected to Wi-Fi option decreases the wait time to access large email attachments when an available Wi-Fi connection is available.
- If prompted, read the Activate device administrator? screen and tap Activate to complete the email setup process.
Note: This process can take a few minutes. If the previous setup screen re-appears, ignore it and do not alter any fields during this process.
- Identify your new work email account with a unique name (Ex: Work), then tap Done.
How to open an Exchange Email on Samsung Galaxy Note 2
- From the Home screen, tap Apps icon > Email icon.
- Tap the account name field (upper-left) to open the complete email account list page.
- Select an exchange email account and tap an email message.
How to refresh Exchange Email on Samsung Galaxy Note 2
- From the Home screen, tap Apps icon > Email icon.
- Select an email account.
- If you are already in an email account, tap the account name field (upper-left) to open the complete email account list page.
- Select an available email account.
- Tap Refresh icon.
How to compose Exchange Email on Samsung Galaxy Note 2
For more information, refer to How to compose Email on Samsung Galaxy Note 2.
How to delete an Exchange Email Message on Samsung Galaxy Note 2
- Touch and hold an email (from your inbox list) and select Delete from the on-screen context menu.
or
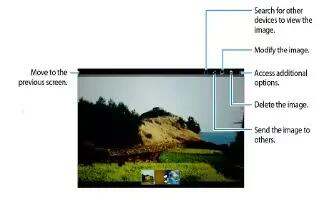
- With the email message displayed, tap Delete icon.


 RSS - All Posts