How To Use Maps On iPad
You can use Maps on iPad to find locations, getting directions, sharing information about locations, showing traffic conditions and so on. Read the article on how to use it.
How to find locations on iPad
- Find a location: Tap Search, then tap the search field to bring up the keyboard. Type an address or other information, then tap Search.
- You can search for information such as:
- Intersection (8th and market)
- Area (greenwich village)
- Landmark (guggenheim)
- Zip code
- Business (movies, restaurants san francisco ca, apple inc new york)
- You can also tap Find icon to find the location of a contact.
- See the name or description of a location: Tap the pin.
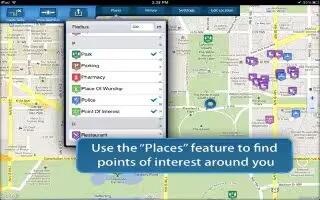
- See a list of the businesses found in a search: Tap List. Tap a business to see its location.
- Find your current location: Tap Compass icon. Your current location is shown by a blue marker. If your location cant be determined precisely, a circle appears around the marker. The smaller the circle, the greater the precision.
- Use the digital compass: Tap Compass icon again. The icon changes to and a small compass appears onscreen.
- Mark a location: Touch and hold the map until the drop pin appears.
Note: Maps, directions, and location-based apps depend on data services. These data services are subject to change and may not be available in all areas, resulting in maps, directions, or location-based information that may be unavailable, inaccurate, or incomplete. Compare the information provided on iPad to your surroundings, and defer to posted signs to resolve any discrepancies. If Location Services is turned off when you open Maps, you may be asked to turn it on. You can use Maps without Location Services.
How to get directions on iPad
Get directions:
- Tap Directions.
- Enter starting and ending locations.
- Tap Find icon to choose a location in Bookmarks (including your current location or the dropped pin), a recent location, or a contact.
- Tap Route, then select directions for driving car icon, public transit bus icon, or walking man icon.
- Do one of the following:
- To view directions one step at a time, tap Start, then tap Next to see the next leg of the trip.
- To view all the directions in a list, tap Start, then tap List icon.
- Tap any item in the list to see a map showing that leg of the trip.
- If multiple routes appear, choose the one you want to use. If youre taking public transit, tap Timer to set your departure or arrival time, and to choose a schedule for the trip. Tap the icon at a stop to see the departure time for that bus or train, and to get a link to the transit providers website or contact info (when available).
- Get directions from a location on the map: Tap the pin, tap Info, and then tap Directions To Here or Directions From Here.
- Bookmark a location: Tap “Add to Bookmarks.
How to Get and share info about a location
- Get or share info about a location: Tap the pin, then tap Info icon.
- Add a business to your contacts: Tap Add to Contacts.
- Tweet, text, or email your location: Tap Share Location. To post a Tweet, you must be logged in to your Twitter account. Go to Settings > Twitter.
How to show traffic conditions
You can show traffic conditions for major streets and highways on the map.
- Show traffic conditions: Tap or drag the bottom-right corner of the screen, then turn on Traffic.
- Streets and highways are color-coded to indicate the flow of traffic:
- Grayno data is available
- Greenposted speed limit
- Yellowslower than the posted speed limit
- Redstop and go
- Traffic conditions arent available in all areas.
How to use Map views
- See a standard, satellite, hybrid, or terrain view: Tap or drag the bottom-right corner of the screen, then select the view you want.
- See the Google Street View of a location: Tap Street view icon. Flick left or right to pan through the 360 panoramic view (the inset shows your current view). Tap an arrow to move down the street. To return to map view, tap the map inset. Street View may not be available in all areas.
Note
This will work on all iPads; including original iPad, iPad 3, iPad 2, and your new iPad.


 RSS - All Posts